Documentation 📖
Your guide to using NodeCanvas in Unity
Creating Custom Object Drawers
Custom Object and Attribute Drawers work very similar to Unity’s Property Drawers feature and with it, it is possible to customize how a certain object (class/struct) appears in all NodeCanvas inspectors, as well as create GUI for custom attributes.
Object Drawers
Let’s suppose we have this example struct (it could also be a class of course).
1 2 3 4 | public struct MyExampleStruct{ public float number; public bool trigger; } |
To create a custom drawer for this object, you simply need to create a class and derive from the generic version of ObjectDrawer, then implement the OnGUI method. For example:
1 2 3 4 5 6 7 8 9 10 | public class MyExampleClassDrawer : ObjectDrawer<MyExampleStruct>{ public override MyExampleStruct OnGUI(GUIContent content, MyExampleStruct instance){ GUILayout.BeginVertical("box"); instance.number = EditorGUILayout.Slider("Number", instance.number, 0, 10); instance.trigger = EditorGUILayout.ToggleLeft("Trigger", instance.trigger); GUILayout.EndVertical(); return instance; } } |
The instance parameter of the OnGUI method above is always of type T. By the end of the OnGUI method you must return the modified instance (this is why a struct was chosen for this example).
That’s it. The drawer will work exactly the same for fields of BBParameter<MyExampleStruct> as well. Both are shown below.
1 2 3 4 5 | public class MyTask : ActionTask{ public MyExampleStruct example; public BBParameter<MyExampleStruct> parameterExample; } |

Attribute Drawers
For this example, we are going to re-create a Range(min, max) attribute. So let’s first create the attribute, with the only requirement being that it has to derive from DrawerAttribute.
1 2 3 4 5 6 7 8 | public class MyRangeAttribute : DrawerAttribute{ public float min = 0; public float max = 1; public MyRangeAttribute(float min, float max){ this.min = min; this.max = max; } } |
Then to create the actual GUI drawer for this attribute, in short, you need to create a class and derive from the generic version of AttributeDrawer. Much similar on how it was done before for ObjectDrawer. In this case, the T argument represents the type of the attribute we need to create the drawer for. The instance here is always of type object. The inherited ‘attribute’ property returns our attribute which we can use to fetch its meta data. No casting is required here since our attribute is of type T. It is always a good idea to check what type the field actually is by checking the inherited property ‘fieldInfo.FieldType’. Because multiple attributes may be used on the same field, it is advised to return MoveNextDrawer() by the end in case the attribute did not actually draw or returned anything. Following is how the drawer implementation of our MyRangeAttribute should ideally look like.
1 2 3 4 5 6 7 8 9 10 11 12 | public class MyRangeDrawer : AttributeDrawer<MyRangeAttribute> { public override object OnGUI(GUIContent content, object instance) { if ( fieldInfo.FieldType == typeof(float) ) { return EditorGUILayout.Slider(content, (float)instance, (float)attribute.min, (float)attribute.max); } if ( fieldInfo.FieldType == typeof(int) ) { return EditorGUILayout.IntSlider(content, (int)instance, (int)attribute.min, (int)attribute.max); } return MoveNextDrawer(); } } |
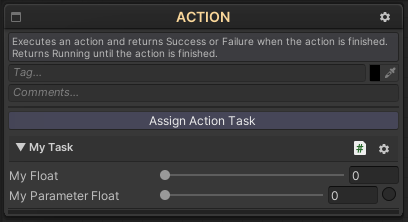
Finally, we simply add this new attribute above a float, or even a BBParameter<float>. It will work exactly the same. Both are shown below.
1 2 3 4 5 6 7 8 | public class MyTask : ActionTask{ [MyRange(0,1)] public float myFloat; [MyRange(0,1)] public BBParameter<float> myParameterFloat; } |

© Paradox Notion 2014-2025. All rights reserved.

