
Documentation 📖
Your guide to using NodeCanvas in Unity

Dialogue Trees
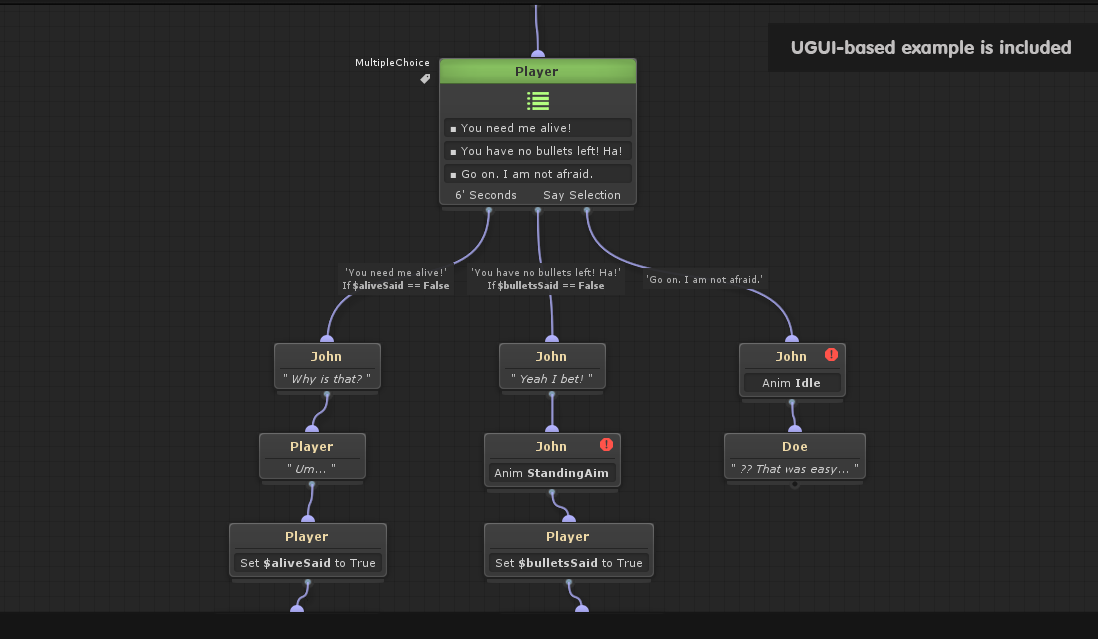 The above Dialogue Tree is included in the downloadable examples
With the Dialogue Trees module included in NodeCanvas, you are able to create non-linear, multi-actor dialogue trees with the same familiar node editor as the rest of the NodeCanvas modules.
1 – Create the Dialogue Tree
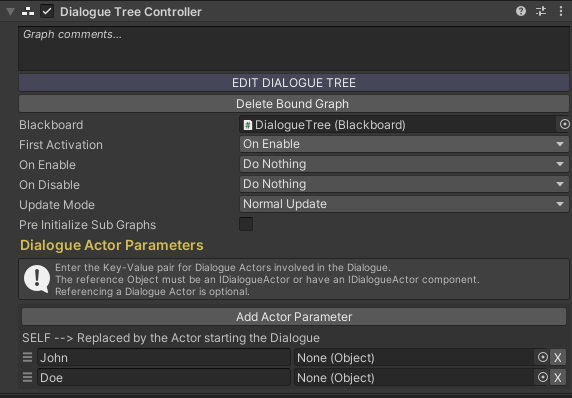
Similar to how a BehaviourTree works with a BehaviourTreeOwner and an FSM with an FSMOwner, Dialogue Trees work with a DialogueTreeController, which can either hold a Bound Dialogue Tree or an Asset Dialogue Tree as usual with other types of graphs. Remember that a Bound Graph supports the ability to hold scene object references, while an Asset Graph, does not support this ability. To create a Dialogue Tree quickly, it is suggested to do so from the top Unity menu “Tools/ParadoxNotion/NodeCanvas/Create/Dialogue Tree Object”. When that is done, a new gameobject with the DialogueTreeController component attached will be created in your scene hierarchy and ready to use.
2 – Define the Dialogue Actors
Within the inspector of the DialogueTreeController or a DialogueTree asset, you will need to define the different actor parameters that will be used by this Dialogue Tree. In the example below, there are two actors defined, those being “John” and “Doe”.
You will notice that on the right side of each actor parameter, there is a DialogueActor field as well. If you want your defined actors above to also have a visual representation within the game world, you will need to add the “DialogueActor” component on the gameobject that represents them, and then assign that gameobject to the respective DialogueActor field.
So for example, if we have a gameobject that we would like to use for “John”, we would need to add the DialogueActor component on that gameobject and then drag&drop that gameobject in the field next to the “John” actor parameter in the Dialogue Tree Controller inspector.
As you will see, the DialogueActor component has only but a few self-explanatory settings relevant to the actor’s appearance in the UI.

3 – Create the Nodes
All Dialogue Tree nodes have one dropdown setting in common at the top of their inspector, that being “which actor this node is for”. Within this dropdown, all previously defined actor parameters will be listed. The actor selected here is the actor that will be used for that node. In the following example, the node has been set to be used by “John”. As such, John is the one that will say “This is a dialogue text”.

The SELF “actor”
By now, you might be wondering what the “SELF” option shown in the actor selection dropdown is. Simply put, the “Self” option is the default actor. When starting a Dialogue Tree from code, you have the option to set its default actor. As such, wherever the Self actor is selected, that default actor will be used, which can prove to be useful for creating reusable Dialogue Trees.
Dynamic Text through Variables
Within the “Say” or “Multiple Choice” nodes of the Dialogue Tree, you are also able to have dynamic dialogue text displayed by the use of the blackboard variables, and by using the variable’s name within square brackets within the text. For example, if you had an integer variable named “apples”, you can write the dialogue text like so:
- “I have [apples] apples in my pocket”.
In-game, “[apples]” will be replaced by the variable’s value ToString and for example show this instead (in case the “apples” variable is an int with a value of 3) :
- “I have 3 apples in my pocket”.
Needless to say, this is very useful and something to remember if you are after creating some dynamic dialogue trees!
4 – Add the UI
You will obviously need a UI to display the dialogue. While you are able to create your own, there already exists one which you can use to get started quickly. All you have to do is to add the prefab named “@DialogueUGUI” in the scene and you are good to go.
Note: For any UI to work correctly, you will also need to add the Unity EventSystem through “GameObject/UI/Event System” if one is not already in the scene.
5 – Start the Dialogue
Starting the dialogue in-game is a matter of a simple function call. For example:
|
1 2 3 4 5 6 7 8 9 10 11 12 13 |
using UnityEngine; using NodeCanvas.DialogueTrees; public class Example : MonoBehaviour { public DialogueTreeController dialogue; void Update(){ if (Input.GetKeyDown(KeyCode.Space)){ dialogue.StartDialogue(); } } } |
If you are working with NodeCanvas FSMs or Behaviour Trees, there also exists an ActionTask called “Start Dialogue” which you can use instead of doing this in code.
Finally, here are various other methods for starting a dialogue, that the DialogueTreeController comes with:
|
1 2 3 4 5 6 7 8 9 10 11 |
///Start the DialogueTree without a default actor public void StartDialogue(); ///Start the DialogueTree with provided default actor public void StartDialogue(IDialogueActor defaultActor) ///Start the DialogueTree with a callback for when it's finished public void StartDialogue(Action<bool> callback) ///Start the DialogueTree with provided default actor and provided callback for when dialogue is finished public void StartDialogue(IDialogueActor defaultActor, Action<bool> callback) |
© Paradox Notion 2014-2026. All rights reserved.